How to Clean Your Husqvarna Automower® (Without Causing Damage)
Your Husqvarna Automower® works hard to keep your lawn looking great — but over time, grass clippings, dirt, and debris can build up and affect its performance. A regular clean not only improves mowing results but also extends the life of your robotic mower.
In this guide, we’ll walk you through the safest way to clean your Automower® without damaging its sensors, electronics, or blades. You’ll also learn how often to clean it, which tools to use, and what to avoid. Keep reading to protect your investment and keep your mower running like new.
How Often Should You Clean Your Automower®?
Husqvarna recommends a light clean every 1–2 weeks, with a more thorough clean once a month — especially during heavy use.
You may need to clean more frequently if:
Your lawn is wet or muddy
You have pets using the yard
The mower is cutting dense, fast-growing grass
You notice buildup under the deck or near the wheels
Tools You’ll Need
Avoid high-pressure hoses or strong chemicals — instead, use these gentle tools:
Soft brush (a clean paintbrush or toothbrush works well)
Plastic scraper or wooden spatula
Damp microfiber cloth
Mild detergent (optional)
Gloves for safety
The Husqvarna Automower Cleaning Kit, is a handy kit to use to maintain your Automower.
❌ Avoid: High-pressure washers, alcohol wipes, or soaking the unit in water. These can damage seals and electronic components.
Need a full professional clean or service? Book a service with APS Pro Services Melbourne’s trusted Husqvarna Automower® specialist.
Step-by-Step Cleaning Guide
1. Turn Off and Unplug the Mower
Always switch the main power off and remove the mower from its charging station.
2. Flip It Safely
Place it on a soft towel or mat. Don’t rest it on the cutting blades directly.
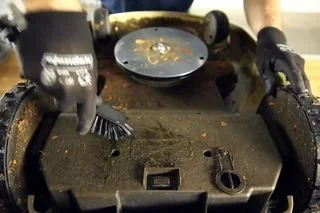
3. Remove Grass from the Deck
Use your scraper or spatula to gently lift off built-up grass and mud around the cutting disc.
4. Brush the Wheels and Axles
Grass often winds around the wheel hubs — use a dry brush to clean these areas thoroughly.
5. Clean Sensors and Charging Contacts
Wipe around the perimeter sensors and charging pads with a dry or barely damp cloth. Avoid pressing water near openings or electronics.
6. Wipe Down the Body
Use a damp microfiber cloth to remove dust and pollen from the outer shell.
Extra Cleaning Tips
Let mud dry before scraping to avoid smearing
Never submerge or hose the unit
Inspect the blades while cleaning — replace if worn or nicked
Use a soft toothbrush for tight areas around sensors and wheels
Clean the charging station contacts periodically for better performance
Conclusion & Next Steps
A clean Automower® is a happy Automower®. Regular cleaning helps maintain efficiency, protects internal parts, and ensures a neater lawn.
Light clean weekly, deep clean monthly
Use gentle tools and avoid water damage
Always power off before starting